9 Steps in Creating Your Online Store with Shopify
Originally published: October 15, 2022 05:22:21 PM, updated: February 21, 2023 10:18:30 AM

If you're ready to sell your products online, there's no better way than through Shopify. Shopify is the most popular eCommerce platform in the world, with over 1 million active merchants. It's easy to set up and use and has tons of features that improve your store. This article will show you how to create a basic online store with Shopify. We'll go over all the steps needed to get your store up and running.
1. Sign up for Shopify
You'll need to sign up for a Shopify account to get started. To create your account, just visit the Shopify website and click the "Get Started" button at the top of their homepage: This fairly straightforward process takes only a few minutes and doesn't require any upfront fees.
Once you've clicked through to this page, you'll be prompted to enter some basic information about your business—name, company address, etc.—and then asks if you want to use an existing domain name or create one from scratch.
If you already own a domain name, simply enter it and continue with the rest of the form before choosing whether or not you'd like them to help transfer over any existing e-commerce platforms or data from other sites.
2. Choose a Shopify plan
Shopify offers three plans: Basic, Shopify, and Advanced.
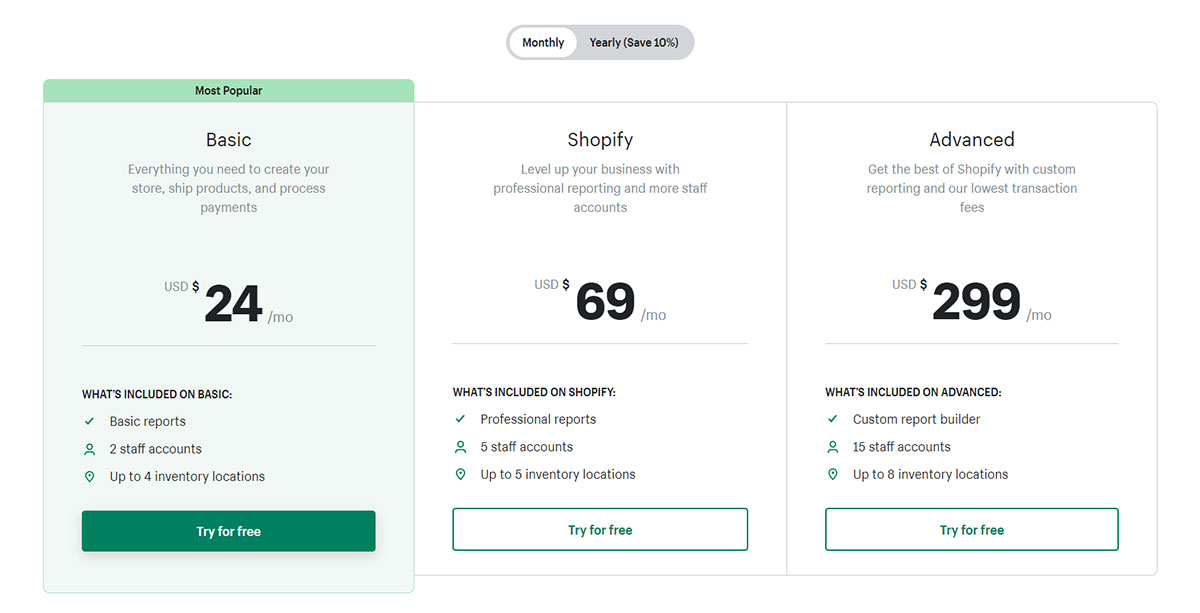
Shopify plan (standard)
The standard Shopify plan is the most popular choice among small businesses because it offers all the features you will need to launch your eCommerce store and start selling products online.
Shopify basic plan
The Basic plan is for new businesses. It includes unlimited products, disk space, and a professional website theme optimized for mobile devices.
Shopify advanced plan
The Advanced plan is worth considering if you're running a large online business with hundreds of thousands of products or more. This has all of the same features as Shopify, plus additional space on your server.
3. Add products
Now that you understand how to set up your store let's get down to the real business of selling stuff.
To add products to your Shopify store, go to Products in the left navigation menu and click "Add a product."
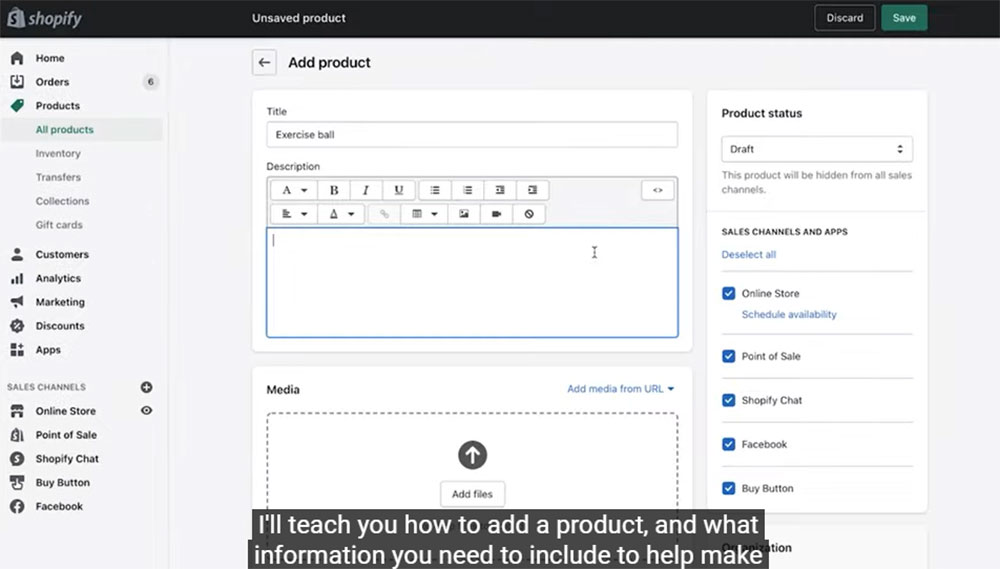
A screen will appear with two options: Add an existing product or create a new one. If you're creating an eCommerce site for the first time, select "Create a new product."
In the "Add a product" screen, you need to fill out five sections: product information, organization, inventory tracking and shipping, pricing and discounts, and images.
Give your product an image, name, and description. These elements will help potential customers understand what they're buying, even if you plan on selling physical goods.
Make sure the images are high quality: a clear photo of the front and back of a smartphone case may work well.
Add product descriptions
The "Descriptions" section is where you'll set up the details of your products. You can include a short description, then go into more depth by providing a full description that includes any pertinent information about the product.
Add product pricing
The "Pricing" section is where you'll set up prices for your products. You can choose a fixed price or use a pricing algorithm to adjust prices automatically based on factors like supply and demand.
Add inventory tracking
Finally, the "Inventory Tracking" section allows you to keep track of how many units are available in your store.
4. Choose a theme/template
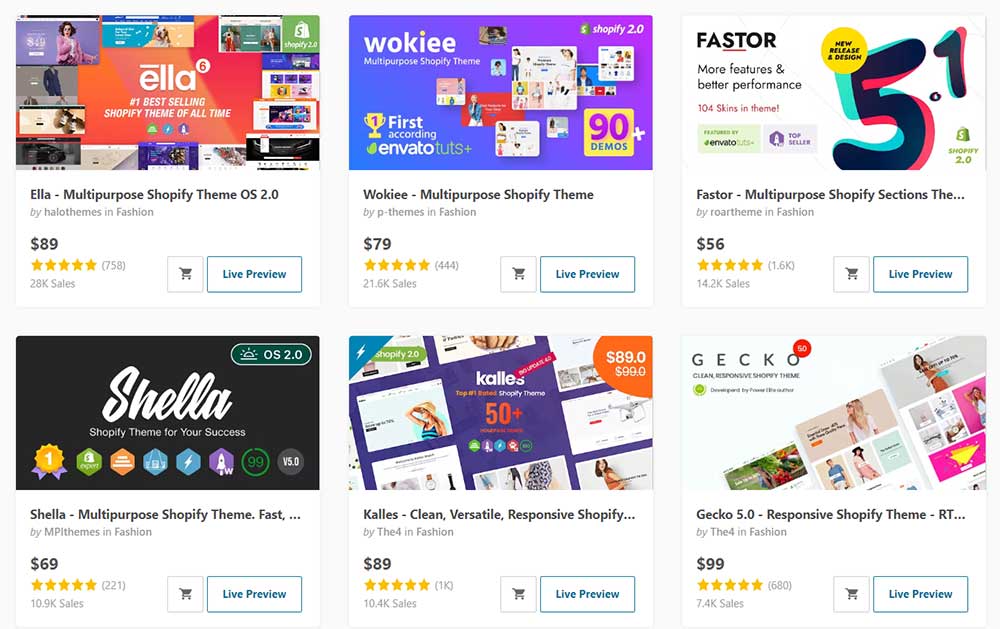
Fortunately, Shopify makes it easy to design an online store and avoids the hassle of hiring React.js developers—so you can focus on what's important: running your business. You'll need to choose a theme for your store, which can be selected from a variety of pre-made templates.
Here are some points to consider before settling on a theme and template:
Choose a Theme That Fits Your Brand: Your choice of theme can significantly impact the overall feel of your store. Think about how you want customers to feel when they visit your site: sleek and professional? Funky and fun? Vintage or modern? The answer will help narrow down your search for a Shopify template.
Choose a Theme That is Easy to Customize: Like any website, your Shopify store should be easy to update and manage. Most templates come with a drag-and-drop editor that lets you customize elements like fonts, colors, and images with just a few clicks. This can save you hours of development time.
Choose a Theme That is Mobile Friendly: If you're selling products in your store, then it's important that it looks good and works well across all devices. Shopify uses a responsive design system, so your site will automatically resize itself based on the device being used to view it (mobile phone vs. a tablet vs. desktop computer). This means you don't have to worry about making separate versions of your site for each type of device.
5. Customize your store
Besides choosing a theme and template, there are other customizations you can make to your store: adding logos, banners—and even installing blogs. While it may be tempting to outsource web development, Shopify provides a quick and simple means of designing an online store through its abundance of customization options and features.
Here are some things to consider when customizing the look and feel of your online store.
Add a logo: A good logo should be eye-catching and visually represent its brand. It should be simple and easy to recognize, even in small sizes. Your logo can be any size, from a tiny icon to a full-screen banner.
Add banners: Banner ads are another way to promote your business. They're usually placed on the top or bottom of a web page and tend to be larger than logos. You can add banners by choosing one of their pre-made templates or creating your own banner from scratch.
Install a blog: Blogs are great for building an audience and keeping them engaged. You can add a blog to your store by choosing one of their pre-made templates or creating your own from scratch.
6. Choose your payment methods
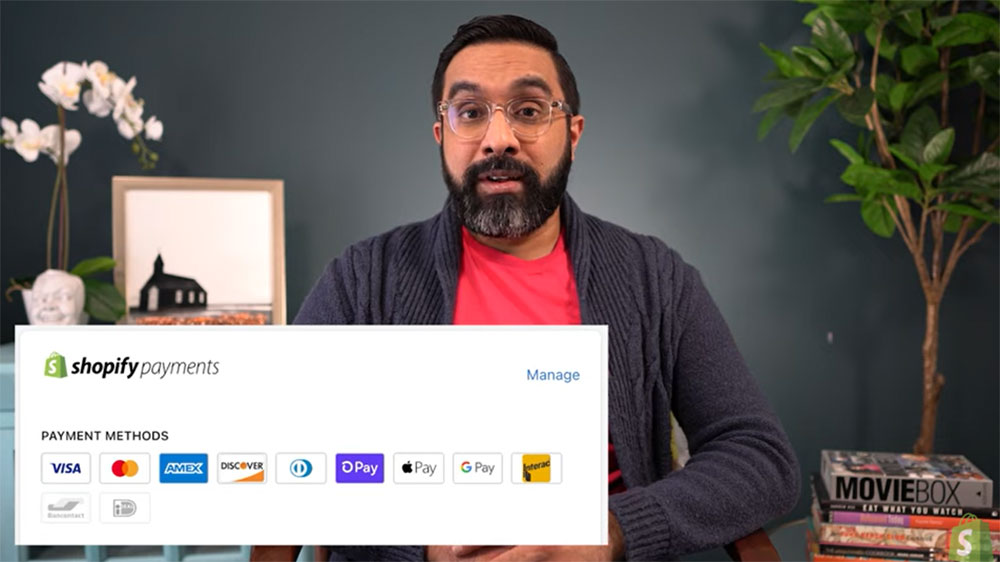
You'll also want to decide on your payment processing method. Shopify offers a wide range of payment gateway options, including PayPal and Stripe (in addition to Apple Pay). This can be a welcome change for merchants who have worked with other platforms in the past.
You can also add a discount code feature to your store. This is especially useful if you're running any kind of promotion or sale. You can set up discounts manually, but Shopify also offers a coupon app that allows you to create automated codes and send them out via email.
7. Set up shipping and delivery
Once you have the basics of your store set up, it's time to add some details that will make your customers feel special. You can do this by setting up shipping and delivery options for different types of purchases.
Here are some of the shipping and delivery methods available on Shopify:
Fixed Shipping Cost: This option allows you to set a flat rate for shipping. This can be useful for small and lightweight items, such as books or stickers. It also works well if you have a single price point for all items in your store.
Free Shipping: Customers will only pay for shipping if they spend over a certain amount. This option is great for encouraging customers to spend more in your store, but it's important to ensure that you set the cutoff point high enough, so your business isn't losing money.
Provide local delivery or pickup: This option allows you to set a delivery fee for your customers. They will have to pay an additional charge if they want their items shipped. This is great for businesses that offer local pickup or delivery services as part of their business model.
To set up your shipping options, head over to Settings → Shipping & Delivery and enter the information for each method. The process is straightforward, but don't forget to add any extra fees or taxes during this step (if applicable). Keep in mind that you can add multiple methods if desired, so customers have a choice when checking out.
8. Set up taxes
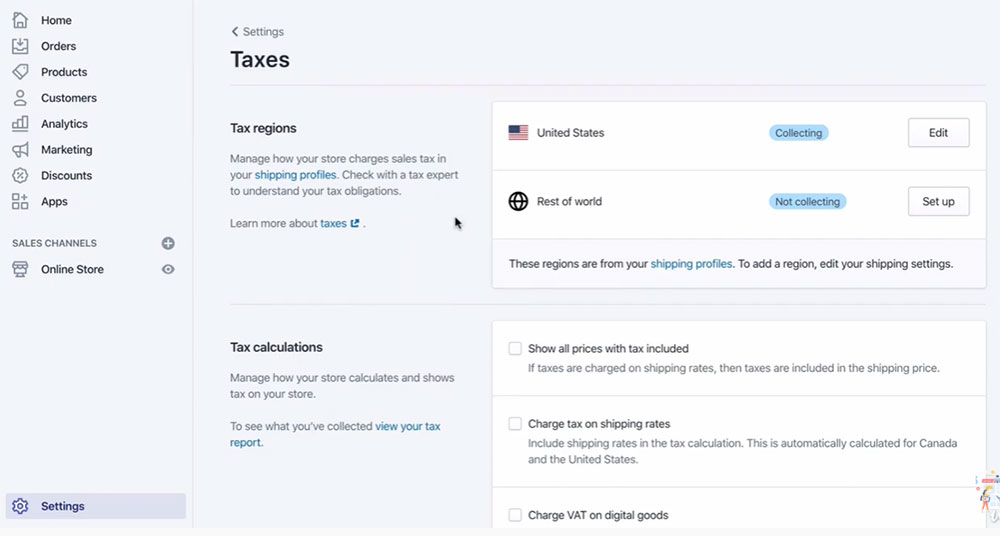
You're almost ready to start selling your products. The only thing left to do is set up taxes for your store.
Setting up taxes will allow Shopify to calculate how much money you owe in taxes and collect it from your customers. This is important because if you don't set up taxes for your online store, then you won't be able to plan for what tax rates need to be paid in different countries and states.
In order to set up Shopify tax settings, go into settings by clicking the gear icon in the top right-hand corner of any page:
Once here, click on Tax Settings under Taxes & Shipping Settings.
From here, you will be able to set up your tax rates based on the location of your customers.
9. Launch your Shopify store!
Launch your store! Launch your Shopify store with a bang. Launch it with a marketing campaign that gets you and your products in front of the right people at just the right time.
Launch it with a sales promotion that's such good people can't resist buying from you. Or launch it with a public relations campaign, which helps establish your credibility as an expert in your industry and get recognition for all the work you put into building your business.
Whatever approach works best for you, launching is an exciting moment in any entrepreneur's life—and when done well, it can lead to even more excellent opportunities down the road.
To Sum Up
There you have it. You're now prepared to start your own online store on Shopify. You've got a great website, the ability to sell products quickly, and many other features that make running an online business much easier. If you have any questions along the way, don't hesitate to reach out.
Join over 145,000 SEO and Google Ads experts. We provide a community to help you engage and learn from industry experts and influencers. Join Now
World-class digital workplace software for a seamless employee experience, whether you have 10 or 10,000 employees.